安装NIS服务(CentOS 7.9)
安装目标
- 安装一个 NIS 服务端实例,该实例所在主机的 IP 地址为 192.168.2.50,对应主机名 nis-master.example.com。
- 安装一个 NIS 客户端实例,该实例所在主机的 IP 地址为 192.168.2.51,对应主机名 nis-client.example.com。
- 使得客户端的用户、用户组、hosts 与服务端的保持同步。
前置条件
- 无。
补充说明
NIS 曾用名 Yellow Pages,简称 YP,这是它的安装包、配置和命令以 yp 开头的原因。
安装服务端
Warning
下面的命令是在主机 nis-master.example.com 上执行的。
-
安装
-
/etc/ypserv.conf配置保持不变
# # ypserv.conf In this file you can set certain options for the NIS server, # and you can deny or restrict access to certain maps based # on the originating host. # # See ypserv.conf(5) for a description of the syntax. # # Some options for ypserv. This things are all not needed, if # you have a Linux net. # How many map file handles should be cached ? files: 30 # Should we register ypserv with SLP ? # slp: no # After how many seconds we should re-register ypserv with SLP ? # slp_timeout: 3600 # xfr requests are only allowed from ports < 1024 xfr_check_port: yes # The following, when uncommented, will give you shadow like passwords. # Note that it will not work if you have slave NIS servers in your # network that do not run the same server as you. # Host : Domain : Map : Security # # * : * : passwd.byname : port # * : * : passwd.byuid : port # Not everybody should see the shadow passwords, not secure, since # under MSDOG everbody is root and can access ports < 1024 !!! * : * : shadow.byname : port * : * : passwd.adjunct.byname : port # If you comment out the next rule, ypserv and rpc.ypxfrd will # look for YP_SECURE and YP_AUTHDES in the maps. This will make # the security check a little bit slower, but you only have to # change the keys on the master server, not the configuration files # on each NIS server. # If you have maps with YP_SECURE or YP_AUTHDES, you should create # a rule for them above, that's much faster. # * : * : * : none -
修改配置/etc/hosts
-
修改配置/etc/sysconfig/network
-
修改配置/etc/sysconfig/yppasswdd
# The passwd and shadow files are located under the specified
# directory path. rpc.yppasswdd will use these files, not /etc/passwd
# and /etc/shadow.
#ETCDIR=/etc

# This option tells rpc.yppasswdd to use a different source file
# instead of /etc/passwd
# You can't mix usage of this with ETCDIR
#PASSWDFILE=/etc/passwd

# This option tells rpc.yppasswdd to use a different source file
# instead of /etc/passwd.
# You can't mix usage of this with ETCDIR
#SHADOWFILE=/etc/shadow

# Additional arguments passed to yppasswd
YPPASSWDD_ARGS=
# The passwd and shadow files are located under the specified # directory path. rpc.yppasswdd will use these files, not /etc/passwd # and /etc/shadow. #ETCDIR=/etc # This option tells rpc.yppasswdd to use a different source file # instead of /etc/passwd # You can't mix usage of this with ETCDIR #PASSWDFILE=/etc/passwd # This option tells rpc.yppasswdd to use a different source file # instead of /etc/passwd. # You can't mix usage of this with ETCDIR #SHADOWFILE=/etc/shadow # Additional arguments passed to yppasswd YPPASSWDD_ARGS="--port 812" -
启动服务
-
设置防火墙
-
创建数据库
控制台输出
At this point, we have to construct a list of the hosts which will run NIS servers. nis-master.example.com is in the list of NIS server hosts. Please continue to add the names for the other hosts, one per line. When you are done with the list, type a <control D>. next host to add: nis-master.example.com next host to add: The current list of NIS servers looks like this: nis-master.example.com Is this correct? [y/n: y] y We need a few minutes to build the databases... Building /var/yp/nis-example-domain/ypservers... Running /var/yp/Makefile... gmake[1]: 进入目录“/var/yp/nis-example-domain” Updating passwd.byname... Updating passwd.byuid... Updating group.byname... Updating group.bygid... Updating hosts.byname... Updating hosts.byaddr... Updating rpc.byname... Updating rpc.bynumber... Updating services.byname... Updating services.byservicename... Updating netid.byname... Updating protocols.bynumber... Updating protocols.byname... Updating mail.aliases... gmake[1]: 离开目录“/var/yp/nis-example-domain” nis-master.example.com has been set up as a NIS master server. Now you can run ypinit -s nis-master.example.com on all slave server. -
添加测试用户和用户组,设置用户密码
-
更新NIS数据库。每次增删改用户、用户组或 hosts 后都需要执行这一步,使修改生效。
安装客户端
Warning
下面的命令是在主机 nis-client.example.com 上执行的。
-
安装
方式一:通过图形化界面配置
-
安装图形化配置所需软件包
-
开启图形化配置界面
-
选择验证配置

-
选择使用NIS后,进入下一步

-
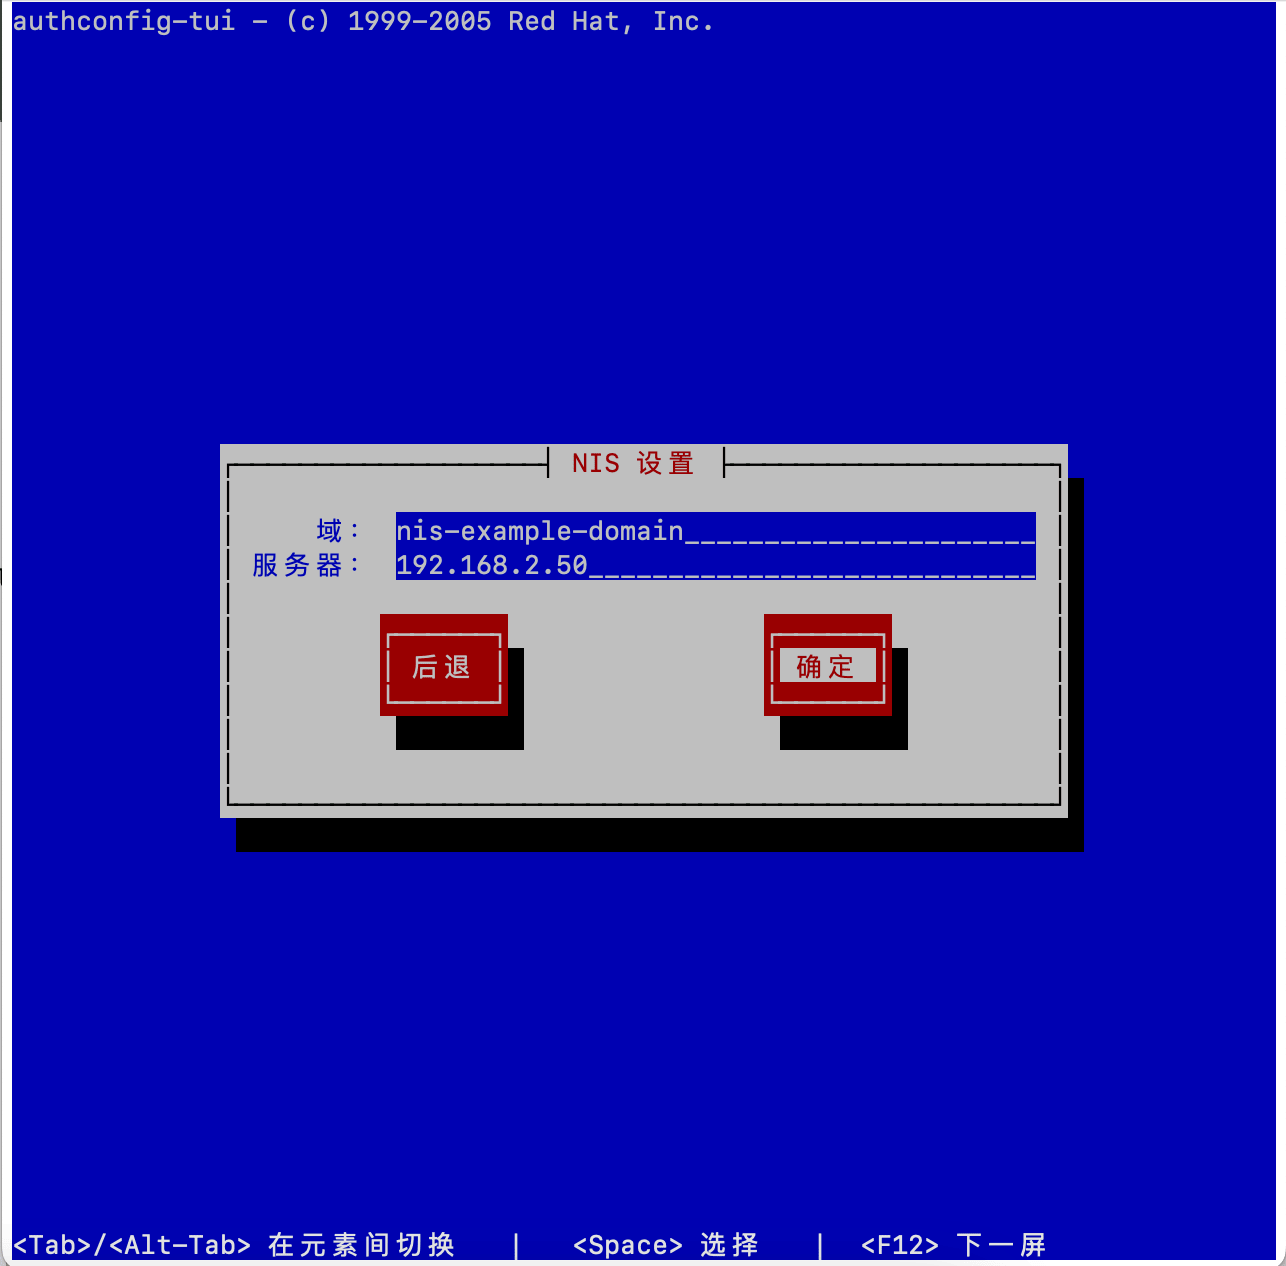
输入NIS域和服务器地址,选择确定后系统自动配置并启动NIS服务
-
系统自动启动NIS服务后会回到如下界面,选择退出即可

方式二:不通过图形化界面配置
-
修改配置/etc/yp.conf
# /etc/yp.conf - ypbind configuration file
# Valid entries are
#
# domain NISDOMAIN server HOSTNAME
#   Use server HOSTNAME for the domain NISDOMAIN.
#
# domain NISDOMAIN broadcast
#   Use  broadcast  on  the local net for domain NISDOMAIN
#
# domain NISDOMAIN slp
#   Query local SLP server for ypserver supporting NISDOMAIN
#
# ypserver HOSTNAME
#   Use server HOSTNAME for the  local  domain.  The
#   IP-address of server must be listed in /etc/hosts.
#
# broadcast
#   If no server for the default domain is specified or
#   none of them is rechable, try a broadcast call to
#   find a server.
#
# /etc/yp.conf - ypbind configuration file # Valid entries are # # domain NISDOMAIN server HOSTNAME # Use server HOSTNAME for the domain NISDOMAIN. # # domain NISDOMAIN broadcast # Use broadcast on the local net for domain NISDOMAIN # # domain NISDOMAIN slp # Query local SLP server for ypserver supporting NISDOMAIN # # ypserver HOSTNAME # Use server HOSTNAME for the local domain. The # IP-address of server must be listed in /etc/hosts. # # broadcast # If no server for the default domain is specified or # none of them is rechable, try a broadcast call to # find a server. # domain nis-example-domain server 192.168.2.50 -
修改配置/etc/sysconfig/network
-
修改配置/etc/nsswitch.conf
#
# /etc/nsswitch.conf
#
# An example Name Service Switch config file. This file should be
# sorted with the most-used services at the beginning.
#
# The entry '[NOTFOUND=return]' means that the search for an
# entry should stop if the search in the previous entry turned
# up nothing. Note that if the search failed due to some other reason
# (like no NIS server responding) then the search continues with the
# next entry.
#
# Valid entries include:
#
#   nisplus         Use NIS+ (NIS version 3)
#   nis         Use NIS (NIS version 2), also called YP
#   dns         Use DNS (Domain Name Service)
#   files           Use the local files
#   db          Use the local database (.db) files
#   compat          Use NIS on compat mode
#   hesiod          Use Hesiod for user lookups
#   sss         Use sssd (System Security Services Daemon)
#   [NOTFOUND=return]   Stop searching if not found so far
#
# WARNING: Running nscd with a secondary caching service like sssd may lead to
#      unexpected behaviour, especially with how long entries are cached.

# To use db, put the "db" in front of "files" for entries you want to be
# looked up first in the databases
#
# Example:
#passwd:    db files nisplus nis
#shadow:    db files nisplus nis
#group:     db files nisplus nis

passwd:     files sss
shadow:     files sss
group:      files sss
#initgroups: files sss

#hosts:     db files nisplus nis dns
hosts:      files dns myhostname

# Example - obey only what nisplus tells us...
#services:   nisplus [NOTFOUND=return] files
#networks:   nisplus [NOTFOUND=return] files
#protocols:  nisplus [NOTFOUND=return] files
#rpc:        nisplus [NOTFOUND=return] files
#ethers:     nisplus [NOTFOUND=return] files
#netmasks:   nisplus [NOTFOUND=return] files

bootparams: nisplus [NOTFOUND=return] files

ethers:     files
netmasks:   files
networks:   files
protocols:  files
rpc:        files
services:   files sss

netgroup:   nisplus sss

publickey:  nisplus

automount:  files nisplus sss
aliases:    files nisplus
# # /etc/nsswitch.conf # # An example Name Service Switch config file. This file should be # sorted with the most-used services at the beginning. # # The entry '[NOTFOUND=return]' means that the search for an # entry should stop if the search in the previous entry turned # up nothing. Note that if the search failed due to some other reason # (like no NIS server responding) then the search continues with the # next entry. # # Valid entries include: # # nisplus Use NIS+ (NIS version 3) # nis Use NIS (NIS version 2), also called YP # dns Use DNS (Domain Name Service) # files Use the local files # db Use the local database (.db) files # compat Use NIS on compat mode # hesiod Use Hesiod for user lookups # sss Use sssd (System Security Services Daemon) # [NOTFOUND=return] Stop searching if not found so far # # WARNING: Running nscd with a secondary caching service like sssd may lead to # unexpected behaviour, especially with how long entries are cached. # To use db, put the "db" in front of "files" for entries you want to be # looked up first in the databases # # Example: #passwd: db files nisplus nis #shadow: db files nisplus nis #group: db files nisplus nis passwd: files nis sss shadow: files nis sss group: files nis sss #initgroups: files sss #hosts: db files nisplus nis dns hosts: files nis dns myhostname # Example - obey only what nisplus tells us... #services: nisplus [NOTFOUND=return] files #networks: nisplus [NOTFOUND=return] files #protocols: nisplus [NOTFOUND=return] files #rpc: nisplus [NOTFOUND=return] files #ethers: nisplus [NOTFOUND=return] files #netmasks: nisplus [NOTFOUND=return] files bootparams: nisplus [NOTFOUND=return] files ethers: files netmasks: files networks: files protocols: files rpc: files services: files sss netgroup: files nis sss publickey: nisplus automount: files nis aliases: files nisplus -
修改配置/etc/sysconfig/authconfig
CACHECREDENTIALS=yes
FAILLOCKARGS="deny=4 unlock_time=1200"
FORCELEGACY=no
FORCESMARTCARD=no
IPADOMAINJOINED=no
IPAV2NONTP=no
PASSWDALGORITHM=sha512
USEDB=no
USEECRYPTFS=no
USEFAILLOCK=no
USEFPRINTD=no
USEHESIOD=no
USEIPAV2=no
USEKERBEROS=no
USELDAP=no
USELDAPAUTH=no
USELOCAUTHORIZE=yes
USEMKHOMEDIR=no
USENIS=no
USEPAMACCESS=no
USEPASSWDQC=no
USEPWQUALITY=yes
USESHADOW=yes
USESMARTCARD=no
USESSSD=yes
USESSSDAUTH=no
USESYSNETAUTH=no
USEWINBIND=no
USEWINBINDAUTH=no
WINBINDKRB5=no
CACHECREDENTIALS=yes FAILLOCKARGS="deny=4 unlock_time=1200" FORCELEGACY=no FORCESMARTCARD=no IPADOMAINJOINED=no IPAV2NONTP=no PASSWDALGORITHM=sha512 USEDB=no USEECRYPTFS=no USEFAILLOCK=no USEFPRINTD=no USEHESIOD=no USEIPAV2=no USEKERBEROS=no USELDAP=no USELDAPAUTH=no USELOCAUTHORIZE=yes USEMKHOMEDIR=no USENIS=yes USEPAMACCESS=no USEPASSWDQC=no USEPWQUALITY=yes USESHADOW=yes USESMARTCARD=no USESSSD=yes USESSSDAUTH=no USESYSNETAUTH=no USEWINBIND=no USEWINBINDAUTH=no WINBINDKRB5=no -
修改配置/etc/pam.d/system-auth
#%PAM-1.0
# This file is auto-generated.
# User changes will be destroyed the next time authconfig is run.
auth        required      pam_env.so
auth        required      pam_faildelay.so delay=2000000
auth        sufficient    pam_unix.so nullok try_first_pass
auth        requisite     pam_succeed_if.so uid >= 1000 quiet_success
auth        required      pam_deny.so

account     required      pam_unix.so
account     sufficient    pam_localuser.so
account     sufficient    pam_succeed_if.so uid < 1000 quiet
account     required      pam_permit.so

password    requisite     pam_pwquality.so try_first_pass local_users_only retry=3 authtok_type=
password    sufficient    pam_unix.so sha512 shadow nullok try_first_pass use_authtok
password    required      pam_deny.so

session     optional      pam_keyinit.so revoke
session     required      pam_limits.so
-session     optional      pam_systemd.so
session     [success=1 default=ignore] pam_succeed_if.so service in crond quiet use_uid
session     required      pam_unix.so
#%PAM-1.0 # This file is auto-generated. # User changes will be destroyed the next time authconfig is run. auth required pam_env.so auth required pam_faildelay.so delay=2000000 auth sufficient pam_unix.so nullok try_first_pass auth requisite pam_succeed_if.so uid >= 1000 quiet_success auth required pam_deny.so account required pam_unix.so account sufficient pam_localuser.so account sufficient pam_succeed_if.so uid < 1000 quiet account required pam_permit.so password requisite pam_pwquality.so try_first_pass local_users_only retry=3 authtok_type= password sufficient pam_unix.so sha512 shadow nis nullok try_first_pass use_authtok password required pam_deny.so session optional pam_keyinit.so revoke session required pam_limits.so -session optional pam_systemd.so session [success=1 default=ignore] pam_succeed_if.so service in crond quiet use_uid session required pam_unix.so -
启动服务
测试用户、用户组、hosts同步情况
Warning
下面的命令是在主机 nis-client.example.com 上执行的。
-
在主机nis-client.example.com上查看用户和用户组是否存在,如果存在说明已经同步
输出 -
在主机nis-client.example.com上ping主机nis-master.example.com,如果可以ping通说明hosts已经同步
输出通过上面2步测试证明主机nis-client.example.com的用户、用户组、hosts 与服务端nis-master.example.com的保持同步。PING nis-master.example.com (192.168.2.50) 56(84) bytes of data. 64 bytes from nis-master.example.com (192.168.2.50): icmp_seq=1 ttl=64 time=0.435 ms 64 bytes from nis-master.example.com (192.168.2.50): icmp_seq=2 ttl=64 time=0.729 ms 64 bytes from nis-master.example.com (192.168.2.50): icmp_seq=3 ttl=64 time=0.837 ms 64 bytes from nis-master.example.com (192.168.2.50): icmp_seq=4 ttl=64 time=0.843 ms --- nis-master.example.com ping statistics --- 4 packets transmitted, 4 received, 0% packet loss, time 3003ms rtt min/avg/max/mdev = 0.435/0.711/0.843/0.165 ms